This week we are preparing for my parent's visit. They have volunteered to come up and stay (in the house!) and help us complete some projects. We have decided that we must at least finish the first half of the house before they arrive. This means getting everything ready to be primed, painted, and refinished in the largest area of the house. All new cracks had to be repaired, trim striped and prepared, and all the little projects that remain.
Here is a picture of Brice repairing the new crack that opened up in the living room. I forgot to get an after picture, but trust me, it looks much better than that.
When we first came into the house, I noticed that there were little tracks all around in the dust. What kind of bug made these?
After a lot of work, I think we are just about ready to move into the bathroom and kitchen! And that bathroom is going to be a lot of work...
5.31.2007
5.27.2007
This is the House that Joint Compound Built
The house is moving rapidly along, and I dare say that we are almost finished with the first half...However, as I was scouring over our previous work, I found that some new cracks had appeared in the plaster! Fortunately for us, the "new" cracks were an assortment of cracks that were either not repaired very well or were along one wall in particular that we had done some heavy hammering on to put in the baseboards. It seems like a nail gun would be helpful to avoid the constant pounding on the walls. But we have moved past that now.
Before we set out to repair the original cracks, I looked up advice on the Internet. There is a lot, and much of it contradictory. So here is what works best for us, but bare in mind that we are not professionals. We have learned by our own mistakes and having to repair MANY cracks in plaster.
First you must determine what kind of crack it is. By this I mean, it is a small superficial crack? Is it a crack that was previously repaired? Or is it a crack where the plaster feels spongy and is separating from the lath?
Small Superficial Crack
These cracks aren't that serious, but it seems that the best way to deal with them is to scrape them out with a utility knife further before you repair them. When we initially started repairing cracks in the house, we were a little too intimidated to do this. Coincidentally, those are the cracks that have reappeared. If you just try to cover them with paint or joint compound, they will most likely return.
Once you have scraped them out further, you will feel as though you have probably made things worse, but in reality you will create a strong "scab" for this crack. Fill the interior with the mix-it-yourself joint compound. We have been using quick dry. These are much harder to use than the pre-mixed varieties of joint compound, but they are actually different. The kind that require you to mix actually have a chemical reaction and they form "crystals". They don't shrink as much as the pre-mixed kind and that is good news for repairing walls that are constantly flexing. The challenge is that most of these kinds of joint compounds dry pretty quickly, and for a novice, it is hard to work that quickly.
Once the crack is filled, stick the mesh tape to the crack. You can cut the tape to match a crack that is not straight (and most aren't). Since the joint compound dries pretty quickly, it might be best to have all this ready ahead of time. Smooth out the joint compound that had squeezed through the tape, and then spread a thin layer over the crack, just enough to hide the tape. You can try to feather the edges with you putty knife, but don't be too picky, since the joint compound dries too quick for perfection. Plus, you will sand later.
We usually wait a day for the compound to dry, which is really more than necessary, but ensures that even large holes and cracks are dry. Using a fine grit sand paper (preferably drywall sand paper, as it doesn't get clogged as easily), sand the crack as smooth as possible without revealing the mesh tape. If you sand too much off, you can add more compound over the crack. Beware, joint compound sands very easily and there will be more on the floor than the wall before you know it. Also be sure to wear a mask and cover anything that you don't want to be layered in white dust. A lot of our cracks required more than one coat to cover all the tape.
Previously Repaired Crack
If you have a crack that has been previously repaired, it will become obvious when you start to open it up and you will find excessive joint compound and sometimes even old mesh tape. In our house, the cracks were giant bulges in the wall. They hadn't always reappeared, but we felt that we could fix them a little better than the previous owners. Generally when you use the mesh tape, you won't see the crack again for a long time. However, these cracks are probably reappearing because they are evidence of your walls flexing at these "stress" points. Therefore, be forewarned that these cracks are signs of movement, though not necessarily a cause for concern. However, if you don't want to be repairing these cracks every few months, then repairing them well is important.
These cracks can be filled the same way that minor cracks are repaired, but you might find that a lot more plaster and old repair must be removed before you can start your own. If by the time you are done, you have a rather large hole in the wall, you must decide if you want to repair this with a lot of joint compound and tape, or if you want to use a drywall patch. If you decide on the former, then continue with the repair as stated above.
If these cracks continue to reoccur, it may be worth looking into a different repair compound other than joint compound. That is what we are familiar with, but I have read where other people have used vinyl spackling, plaster of Paris, and once on television, some sort of caulk. If we get a persistent crack, I will consider these compounds before repairing again.
Spongy Cracks
These cracks are a problem. If you can push on the plaster and there is give, then the plaster is separating from the lath. We actually had quite a few of these cracks in the hallway. One option for dealing with these cracks is to try to reattach the plaster to the lath with a screw. (Do not use nails, as they are hard to put in plaster and the pounding usually just exasperates the problem). This does work if it is a small area. However, we used a washer with the screw, because it often went through the plaster and just left yet another hole. Yet even a flat head screw sits enough away from the wall to leave a small bulge when you cover it.
My advice for these kinds of cracks, is to remove the plaster until you reach a point where it is no longer separating. Often this will require a drywall patch. If you are the type of person that wants perfect walls, that are not covered in an assortment of joint compound and drywall, then I would consult a professional. If you are like us, and just want walls that are smooth and usable, then check out our repairs in the closet and the hallway.
Hallway Repairs
We are not looking to be on the historic registry, so we just want a wall that is not riddled in cracks. Plus our budget does not lend itself to hiring professionals unless absolutely necessary.
When you have repaired the crack to you liking, you may want to texture the crack to appear like the surrounding walls. There are a lot of ways to do this, but for a simple texture like in our house, you can use a wet sponge with the pre-mixed joint compound (not the kind that dries quickly) and sponge it on. Different sponges with different textures will create a variety of results. If you don't like it, use a wet sponge to gently wipe it off. When the repair is all finished, prime it before painting.
So that is my advice for anyone repairing cracks in their plaster. There are a lot of website out there with instructions, but that is what has worked best for us. Under no circumstances paint over the crack! You will see that crack again in a matter of days.
5.22.2007
Houseblogs.net
5.21.2007
Just one more thing...
Some Problems...
There are a couple of problems in this house that are going to be difficult to fix. 90% of the time they center around the floor. As floors got old they were replaced, but the previous owners went ahead and built the new floors on top of the original floors. I have to assume that the old floors were too worn out to be restored, but in a few rooms (the master bedroom and the office) the large slab pine floors still remain. If the house was going to bring enough return, the best solution would be to remove floors all the way to the sub floor and put in the hardwood in there. However, I don't have the money to do this. The problem begins where the two floors come together. I need a solution that will disguise this unevenness as best as possible.
In the office, the previous owners layered the oak floor on top of the pine floor making a slight step into the office. Although they never stained this piece, it is the most aesthetically pleasing of the door thresholds. It is hard to see relief in this picture, but there is a slight step up.
In the master bedroom there was also a step from the dining room, but they did not layer the floors on top of the old floors. They seem to end abruptly and leave a rather large gap under the bedroom door (like 6 inches). The smaller door, which opens into the hallway, had a piece of board painted white. Unfortunately you could still see the floors boards from the side.
We removed the board here
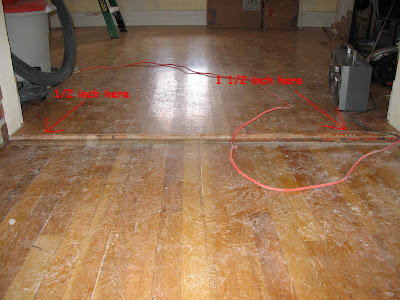
The final problem with the floor is where the living room and dining room floors meet. They are approximately on the same plane with each other, but they were not redone at the same time. The people who finished the living room floor took the time to level it, while the dining room floor is slanted. Where they met, there was a threshold piece (fake wood) that did not fit there evenly, since the floors are not even.
Here it has been removed and you can see the unevenness of the floors.
I was thinking about asking a woodworker to cut some of these pieces custom for me. I wasn't sure how much that would cost, and I would want it made from oak, since that would match the newer floors. If anyone knows a woodworker that could do this for a reasonable price or has an idea that could make these floors look pretty, please let me know.
5.19.2007
Soon, Very Soon...
The front half of the house is almost complete. A little more scraping of the trim and we will cross over into the second half of the house... A time for celebration perhaps? We shall see. Although there is less old paint to remove, there are many new problems that will take some creative thinking and assumably lots of labor.
So let me recap what had been going on in the house since the last time I posted.
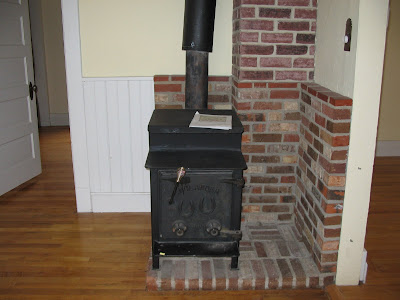
The dining room had some fake brick around the stove. It was a thin veneer that didn't match the surrounding brick. I tried hard to let it go, but it HAD to go. We removed the old brick wall and found a heat vent that runs along the wall there. We decided to re-build the wall, but will have to use a heat shield to protect the new drywall, since the old wall was a little toasted from the previous owners.
Before
After demolition
After the wall was re-built (Eventually, I wouldn't mind fixing the bend in the pipe as well.)
Remember the hallway? Well, the drywall is completed and the trim has been replaced. It looks crappy at the moment, but keep in mind that we will paint the trim white and everything should be happy again.
Plus as far as the trim goes, I cut all the cove pieces throughout the first part of the house. They are just setting in place right now, since we need to take them off while we finish the floors.
Before
After
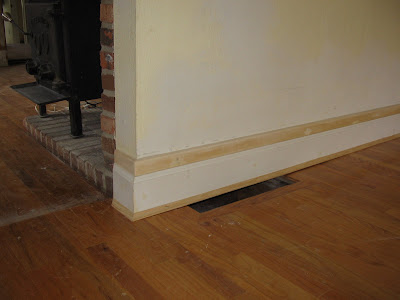
Sorry I can't resist showing off the baseboard work, since that was my project. Notice the cutout around the new brass cable plug. Oh yeah!
After a lot of convincing, Brice fixed the crack in the ceiling from the living room fan. He really didn't want to, as he thought he wouldn't be able to do it, but he did a great job with joint compound and a comb...it will be painted.
In the master bedroom, we worked on the closet. Lots of small things there. We ditched the closet organizer, since it wasn't even put in straight and fixed the walls.
Before (look at the baseboards and the plywood wall on the left)
Rebuilding the wall
Almost there...just need some paint and a new closet organizer.
Subscribe to:
Posts (Atom)