4.22.2007

Alphabet Soup

Another weekend, another day closer to moving in.

Brice continued work on the hallway. Just three small walls, but by far the most challenging area of the house. The east wall was actually a piece of plywood. Normally we would rip this out and replace it with wallboard. However, spatially challenged Do-It-Yourselfers did not leave enough room in either the closet or hallway to frame a wall. We decided that the best option was to attach wallboard to the plywood. When Brice removed the trim to do this, we found the plywood wall was not really attached to anything at the bottom; sort of like a sideways saloon door. We talked about solutions, only to find that best approach would be to use shelf brackets to secure the wall in place. Then when the trim is put back on, the brackets would be hidden and the wall would be secure enough to put drywall on both sides. I sure hope that the next owners don't think that we put the plywood there to begin with!

The other two walls had enormous cracks in them, plus what appeared to be peeling, painted wallpaper. After Brice chipped away at the walls, he realized that it would be easiest to just remove the failing plaster and lath and replace it with wallboard. Everything that I have read suggests keeping plaster walls since they add value to older homes, have insulating qualities, and dampen sound. However, at some point (when the plaster is bulging at every seem), it just doesn't make any sense. If I had my way, I probably would replace most of the plaster in this home with wallboard, but I don't have the time or money to address all the problems this would bring (like replacing all the trim for one).

Here is the hallway in all its glory... Notice the quarter round where the angles converge.


And here is the hallway after Brice had finished 2/3 of the walls. Notice the outlet at eye level (probably for a clock?). The wall that is facing the camera is made of plywood.

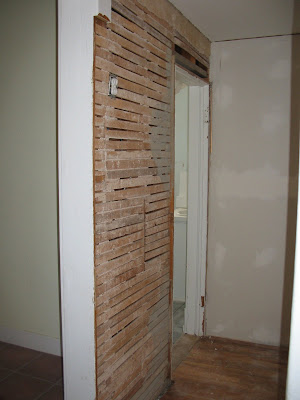


A shot of the wall after Brice put up the drywall. He wants everyone to note his electrical genius (the plug is now lower).


After a long day of building walls, we went out back to investigate a large metal cover bolted into the ground. Here is Brice breaking the hundred-year-old bolts with his bare hands...


It looked like something that would normally enclose water lines for a sprinkler system. However, it revealed something much more sinister. Could this be the opening to Hades?
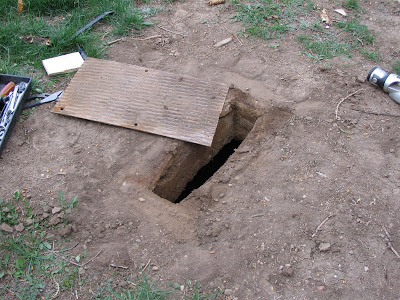


or an hundred-year-old septic tank?


If you look closely you can see a really old bottle of ginger ale and what appears to be children's magnetic letters. We are assuming that the bottle (and possible some of the other items) were not flushed, but probably did float to the bottom. Yummy!


Ultimately, I would like to keep some of the more interesting things we find in the house and put them all together in a some sort of an art piece. We have collected a smattering of wallpaper, old tile, nails, and various other items. However, I would really like that bottle! Any suggestions for retrieving it would be greatly appreciated.

4.14.2007

All wrong...

It turns out that I should have read the trim books a little more closely, since we haven't been doing it right. The first problem is a miter saw that doesn't cut the same on both ends. It is a small difference, but that small difference is magnified as you move away from the angle. The other problem is that I was not using a coping cut on the inside corners. I was attempting to miter an inside corner, and apparently, that was not necessary when you are using the large flat stock baseboards. Additionally, coping the inside corners is only for baseboards that are not flat (i.e. the molded baseboard and the cove).

So today I am off to the Home Depot to get a little more lumber and correct those mistakes!

4.11.2007

Swatch this!

A few weeks ago I ran across one of those guys on the street corners that hold signs for businesses. This particular sign was actually of some interest to me, since it proclaimed that a local fabric store was going out of business. While this was disappointing news, the real problem was that I wanted to go there and spend my money, but I really needed to save all my pennies for the house. Flash to last night, when I realized that I could indeed shop at the closeout sale, while putting money into the house. I needed to make curtains for my new investment, so off I went!

The first thing that I had done in the house was pick out paint for the rooms. I never realized that it would take so long. But it made it a lot easier to pick out fabrics for the curtains. Here are the paint swatches for the house. Bare in mind that the colors are not completely true to the actual colors. For instance, the kitchen and laundry room have a lot more green in them (or at least they will).


Here are the fabric swatches...


For the small windows, I will probably just make a simple swag like the two on the top. I like the design of the one on the left. However, it will be flat like the one on the right. For the larger windows, I think some tabbed curtains like the one below reflect a nice simple style. What makes this even better, is that I already found and bought some wrought-iron looking curtain rods at Big Lots for a good price.


On a final note, I forgot to publish the pictures of the bathroom. We ripped out the old tub surround and the quarter round along the back of the counters. Since it was glued and caulked so efficiently, part of the counter top surface was removed with the quarter round. A new white counter top is pretty cheap, but I am considering just tiling it to give it a more unique look.


4.10.2007

Arts and Crafts

After a couple trips to the library and countless internet searches, it seems that I have an Arts and Crafts style house. This was a movement that began in England in response to the Victorian style, which was considered too opulent and affluent for early settlers. The idea was simple and clean lines; a minimalist approach. Although compared to today's boring trim work, it seems that even Arts and Crafts style is considerably more decorative then most houses that I have lived in.

After stripping the trim around the doors and some of the baseboards, it appears that most of the woodwork is not the original. In fact the front baseboard was a composite. I was pretty sure that the previous owners had just made some new style up. But alas, my baseboards are in fact a legitimate style and not just a way to cover up no longer existing plaster on the walls.

My baseboards are very tall (nearly 8"). Most are not original, but instead a piece of pine board. The originals are rounded on the corners. The second baseboard is a colonial (5 1/4") composite baseboard. Although the original trim was not definitely composite, once it is painted, it is hard to tell the difference. There is only a slight difference in price. However, I will probably also use the composite, since the baseboards are to be painted white. The final piece, which is missing in all the rooms but one, is the "shoe piece" or a piece of quarter round at the bottom. This is critical, since this covers any imperfections and hides the fact that the floor is not level. In the office, there is a shoe molding, but it is a cove. I think that I like it better than the quarter round, which they managed to shove into every corner, but the baseboards.

So here is what the baseboards are supposed to look like...


Here is a picture of the office baseboard...


Here is the living room trim. it is hard to tell from this picture, but it is crooked in many places, isn't beveled in the corners, is dripping with paint, and is missing the shoe...


And here we are, replacing and finishing the baseboards in the living room...


Not quite finished, since we can't add the shoe piece until we are finished with sanding the floors. We attempted to cut some inexpensive cove that I got at the building salvage store. It is very difficult to visualize and make sure that the piece is not upside down or backwards when cutting. Thankfully when I was going through the garage I found some more lengths of the molded colonial baseboard and cove. Finally something left in the house that is worthwhile!

4.08.2007

Let There Be Light!! And it Was Good...

In the living room, we replaced the horrible brass fan and opted for a semi-flush mount light (Yes, I kept the lights that were ivory).


In the dining room I bought small chandelier that we will swag over to the northwest corner. I decided to keep the electricity in the middle of the room, since you never know what the next people might want. This way it is more flexible.


In the kitchen, I replaced the cheap-looking track lighting with something more contemporary and new lights over the sink.


Since the bathroom fixtures are going to be bronze, I decided to match the new lights with the faucet and shower. This light is my favorite and is both a venting fan and a light.


The laundry room also got a new light, since the old one looked like a glass jar. Although this one pretty much looks like a boob.


We asked for a few floor outlets, since that exterior wall cannot be penetrated. Here is one in the office.


I don't have pictures right now, but the electricias also put two lights in the crawl space and an outlet where a radon mitigation fan can be installed. The basement sure looks differnt with light on it. I finally grabbed the shop vaccuum and cleaned out the dirt and cobwebs. Just like new!

The guys did a great job, but we will truly see when we get the bill if they are close to their estimate.

4.01.2007

Miracle Electric

Working in the house has come to a complete halt. Last week we had a conference in Vail and this week the electricians finally had some time for our little projects. Things actually look worse than they ever had, but I have faith that the house will be beautiful when it is finished. Probably not before I lose my mind, but at some future point...

The electrical work is probably the only project that I am not comfortable doing myself. A lot of what they are doing is putting in new outlets and some lighting, but I also asked to make sure that the old knob and tube wiring was removed, and any safety issues addressed. Although the old owners has put some work into the electricity, not much of it made sense. We had outlets in the closet, porch lights in the bedroom, and many extra switches that as far as we can tell went to nothing. The biggest problem in the house is the absence of outlets. With all the appliances and electronics in use today, a lot more outlets are required for the modern man. Since the exterior wall is brick with a layer of plaster over it, it is virtually impossible to put any outlets on those walls. We opted for a few floor outlets, since we didn't want to drag extension cords across the rooms or overload the existing outlet in each room.

It was also recommended that we just remove the old baseboards and replace them. Although that is not the most cost efficient way of doing things, now that we have secured a miter saw, it does appear more intriguing to me every day. Surely it is better than trying to strip all the wood work, which is most likely not even the original. Today I will head over to the Home Depot and try to get some costs on that project.