
Showing posts with label baseboards. Show all posts
Showing posts with label baseboards. Show all posts
11.16.2008
For the Reader...
I had a comment in the last post that asked if I could put a detailed picture of our baseboards up. So here it is:


5.19.2007
Soon, Very Soon...
The front half of the house is almost complete. A little more scraping of the trim and we will cross over into the second half of the house... A time for celebration perhaps? We shall see. Although there is less old paint to remove, there are many new problems that will take some creative thinking and assumably lots of labor.
So let me recap what had been going on in the house since the last time I posted.
The dining room had some fake brick around the stove. It was a thin veneer that didn't match the surrounding brick. I tried hard to let it go, but it HAD to go. We removed the old brick wall and found a heat vent that runs along the wall there. We decided to re-build the wall, but will have to use a heat shield to protect the new drywall, since the old wall was a little toasted from the previous owners.
Before
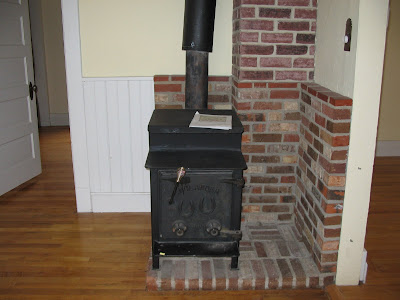
After demolition

After the wall was re-built (Eventually, I wouldn't mind fixing the bend in the pipe as well.)

Remember the hallway? Well, the drywall is completed and the trim has been replaced. It looks crappy at the moment, but keep in mind that we will paint the trim white and everything should be happy again.


Plus as far as the trim goes, I cut all the cove pieces throughout the first part of the house. They are just setting in place right now, since we need to take them off while we finish the floors.
Before

After
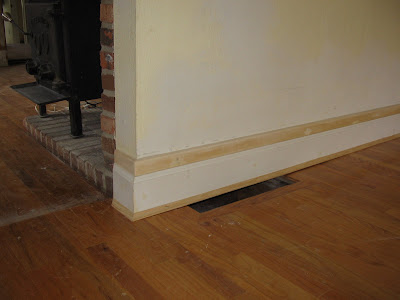
Sorry I can't resist showing off the baseboard work, since that was my project. Notice the cutout around the new brass cable plug. Oh yeah!

After a lot of convincing, Brice fixed the crack in the ceiling from the living room fan. He really didn't want to, as he thought he wouldn't be able to do it, but he did a great job with joint compound and a comb...it will be painted.

In the master bedroom, we worked on the closet. Lots of small things there. We ditched the closet organizer, since it wasn't even put in straight and fixed the walls.
Before (look at the baseboards and the plywood wall on the left)

Rebuilding the wall

Almost there...just need some paint and a new closet organizer.

So let me recap what had been going on in the house since the last time I posted.
The dining room had some fake brick around the stove. It was a thin veneer that didn't match the surrounding brick. I tried hard to let it go, but it HAD to go. We removed the old brick wall and found a heat vent that runs along the wall there. We decided to re-build the wall, but will have to use a heat shield to protect the new drywall, since the old wall was a little toasted from the previous owners.
Before

After demolition

After the wall was re-built (Eventually, I wouldn't mind fixing the bend in the pipe as well.)

Remember the hallway? Well, the drywall is completed and the trim has been replaced. It looks crappy at the moment, but keep in mind that we will paint the trim white and everything should be happy again.


Plus as far as the trim goes, I cut all the cove pieces throughout the first part of the house. They are just setting in place right now, since we need to take them off while we finish the floors.
Before

After

Sorry I can't resist showing off the baseboard work, since that was my project. Notice the cutout around the new brass cable plug. Oh yeah!

After a lot of convincing, Brice fixed the crack in the ceiling from the living room fan. He really didn't want to, as he thought he wouldn't be able to do it, but he did a great job with joint compound and a comb...it will be painted.

In the master bedroom, we worked on the closet. Lots of small things there. We ditched the closet organizer, since it wasn't even put in straight and fixed the walls.
Before (look at the baseboards and the plywood wall on the left)

Rebuilding the wall

Almost there...just need some paint and a new closet organizer.

4.14.2007
All wrong...
It turns out that I should have read the trim books a little more closely, since we haven't been doing it right. The first problem is a miter saw that doesn't cut the same on both ends. It is a small difference, but that small difference is magnified as you move away from the angle. The other problem is that I was not using a coping cut on the inside corners. I was attempting to miter an inside corner, and apparently, that was not necessary when you are using the large flat stock baseboards. Additionally, coping the inside corners is only for baseboards that are not flat (i.e. the molded baseboard and the cove).
So today I am off to the Home Depot to get a little more lumber and correct those mistakes!
So today I am off to the Home Depot to get a little more lumber and correct those mistakes!
4.10.2007
Arts and Crafts
After a couple trips to the library and countless internet searches, it seems that I have an Arts and Crafts style house. This was a movement that began in England in response to the Victorian style, which was considered too opulent and affluent for early settlers. The idea was simple and clean lines; a minimalist approach. Although compared to today's boring trim work, it seems that even Arts and Crafts style is considerably more decorative then most houses that I have lived in.
After stripping the trim around the doors and some of the baseboards, it appears that most of the woodwork is not the original. In fact the front baseboard was a composite. I was pretty sure that the previous owners had just made some new style up. But alas, my baseboards are in fact a legitimate style and not just a way to cover up no longer existing plaster on the walls.
My baseboards are very tall (nearly 8"). Most are not original, but instead a piece of pine board. The originals are rounded on the corners. The second baseboard is a colonial (5 1/4") composite baseboard. Although the original trim was not definitely composite, once it is painted, it is hard to tell the difference. There is only a slight difference in price. However, I will probably also use the composite, since the baseboards are to be painted white. The final piece, which is missing in all the rooms but one, is the "shoe piece" or a piece of quarter round at the bottom. This is critical, since this covers any imperfections and hides the fact that the floor is not level. In the office, there is a shoe molding, but it is a cove. I think that I like it better than the quarter round, which they managed to shove into every corner, but the baseboards.
So here is what the baseboards are supposed to look like...

Here is a picture of the office baseboard...

Here is the living room trim. it is hard to tell from this picture, but it is crooked in many places, isn't beveled in the corners, is dripping with paint, and is missing the shoe...

And here we are, replacing and finishing the baseboards in the living room...


Not quite finished, since we can't add the shoe piece until we are finished with sanding the floors. We attempted to cut some inexpensive cove that I got at the building salvage store. It is very difficult to visualize and make sure that the piece is not upside down or backwards when cutting. Thankfully when I was going through the garage I found some more lengths of the molded colonial baseboard and cove. Finally something left in the house that is worthwhile!
After stripping the trim around the doors and some of the baseboards, it appears that most of the woodwork is not the original. In fact the front baseboard was a composite. I was pretty sure that the previous owners had just made some new style up. But alas, my baseboards are in fact a legitimate style and not just a way to cover up no longer existing plaster on the walls.
My baseboards are very tall (nearly 8"). Most are not original, but instead a piece of pine board. The originals are rounded on the corners. The second baseboard is a colonial (5 1/4") composite baseboard. Although the original trim was not definitely composite, once it is painted, it is hard to tell the difference. There is only a slight difference in price. However, I will probably also use the composite, since the baseboards are to be painted white. The final piece, which is missing in all the rooms but one, is the "shoe piece" or a piece of quarter round at the bottom. This is critical, since this covers any imperfections and hides the fact that the floor is not level. In the office, there is a shoe molding, but it is a cove. I think that I like it better than the quarter round, which they managed to shove into every corner, but the baseboards.
So here is what the baseboards are supposed to look like...

Here is a picture of the office baseboard...

Here is the living room trim. it is hard to tell from this picture, but it is crooked in many places, isn't beveled in the corners, is dripping with paint, and is missing the shoe...

And here we are, replacing and finishing the baseboards in the living room...


Not quite finished, since we can't add the shoe piece until we are finished with sanding the floors. We attempted to cut some inexpensive cove that I got at the building salvage store. It is very difficult to visualize and make sure that the piece is not upside down or backwards when cutting. Thankfully when I was going through the garage I found some more lengths of the molded colonial baseboard and cove. Finally something left in the house that is worthwhile!
Subscribe to:
Posts (Atom)

